HOW TO MAKE FAUX METAL LETTERS OUT OF FOAM CORE (AND INSTALL THEM).
In October I made these cool block letters for my new daughter's bedroom. It took quite some time but when I finished I was quite happy with the outcome. Which is rare.
Not one to let things go, I started another set for my nephew's wall and documented the process. This time I took it in a slightly different direction. I wanted to mimic the metal or brushed aluminum letters you sometimes see in offices and stores.
Here's how I did it and how you can too!
MATERIALS:
-doublethick foam core (or the regular stuff)
-sharp pencil
-exacto knife, matte knife
-white glue
-paint brush
-metallic spray paint
STEP 1. GETTING MATERIALS
Get yourself some doublethick foam core. You can use the regular kind if you want but the thick stuff will save you time if you want depth to your letters. You may have to hunt for this though because it's not at your neighbourhood Staples. I snagged some from Woolfitt's on Queen St. West in Toronto.
STEP 2. DESIGNING
Use an appropriate application on your computer to map out the letters you desire and print them out. I used Adobe Illustrator and made the letters white with a .5 pt black stroke on them. You don't have to use a fancy app like Illustrator though—-heck, you could probably even do it in Microsoft Word. Now take your print out(s) and very, very carefully cut the letters out. You could use scissors but I used an exacto knife and matte knife.

STEP 3. TRACING
Lay your letters on the foam core and use a pencil to lightly trace the contours of the letterforms. Ensure that your letters don't shift at all while you trace.
STEP 4. CUTTING
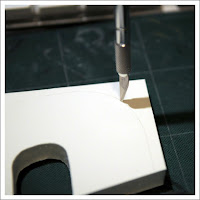
This is the most time consuming part of the project——the cutting. Take your exacto knife and begin to puncture the surface along the pencil lines you just made on the foam core. This will make it easier to remain precise with the deeper cutting that comes next. Make several passes with the knife, going ever deeper until you're through.

Two things to remember when cutting out your letters are
1. to keep the cutting edge of the blade of your knife perfectly straight (the knife movements as you cut should be perfectly up and down) to avoid funny-looking letters.
2. Take your time! This is going to take a while. This part alone took me about six hours (my daughter's took about 30!).

STEP 5. SEALING
When you have all your letters it's natural to want to grab the spray can and go nuts. But wait, there's an important step that precedes this.
Most kinds of spray paint will actually eat styrofoam on contact, so we have to seal the edges. Take white glue (PVS) and your paint brush and apply the glue to the edges of the letters. This was a pain for me getting into the crook of the 'A'. Give your letters at least two coats. I was kind of lax at one point--you can see the bottom of my 'A' is a little eaten by paint.

An important consideration at this stage and for every stage hereafter is to place your letters on some makeshift 'stilts'. If you lay your 'glued' letters on a surface to dry you make come back to find them firmly stuck! I made quick risers out of extra foam core to rest my letters on to avoid sticking.
STEP 6. PAINTING
We're ready to start spraying (in a well-ventilated area). There is a method at this stage as well. You will want to ensure that the sides/edges of your letters are painted first. What I recommend is placing your letters upside down on their stilts and spray painting the edges.

Why upside down? Because when we are ready to paint the forward facing side we want to make sure that we're applying paint to a relatively smooth and untouched surface.
I applied several coats to the edges of my letters over the course of a week. Then I flipped the letters and applied paint to the fronts. This took several coats as well.

STEP 7. FINISHING
You're technically done! I inspected my letters for flaws and 'hickeys' and carefully dealt with each. Then I glued my stilts to the backs of my letters so they would have that nice effect of popping off the wall.
STEP 8. MOUNTING
Mounting your letters is another exercise altogether. Trying to perfectly mount a string of letters
in a level, straight line with perfect letter spacing (kerning) is a challenge. Now if you're dumb, you'll charge right in and step back and see your hard work anchored crookedly to the wall. Fortunately I had an idea. As with many kinds of installation we rely on scaffolding. Here's what I did. I lined up my letters on my work surface and fiddled with the spacing until I was happy with how it looked. Then I took two strips of foam core that I had cut and applied a VERY small bead of rubber cement along each. Then I carefully lowered them on to the letters and applied pressure to them by placing lightly-weighted objects on them (I used coffee mugs because they were within reach).
After 30 minutes or so I was able to pick up the entire set of letters as a single unit. I flipped it over and applied double-sided mounting tape to the stilts.
Then I stretched a leveled string across the wall to which I was installing the work and used that to line up the scaffold of letters. Then the work was stuck on the wall; bing, bang, boom. No fuss. Finally the two strips of foam core scaffolding were carefully pulled off to reveal a finished product.

And you're done! Have fun!
1 comment:
Thanks for sharing
Metal Letters
Post a Comment